Embedding Chatbots & Workflows
A comprehensive guide to embedding your MindPal chatbots and workflows on your website or platform.
What is Embedding?
Embedding allows you to integrate your MindPal chatbots and workflows directly into your website, platform, or application. Instead of sending users to a separate MindPal page, they can interact with your AI tools right where they already are - creating a seamless, branded experience.
What Can Be Embedded?
- Published Chatbots: AI agents published as interactive chatbots
- Published Workflows: Multi-agent workflows published as interactive forms
Both types can be embedded using the same methods, though some features may vary.
How Embedding Works
When you publish a chatbot or workflow in MindPal, you get:
- A unique URL - A shareable link that anyone can access
- Embedding code - HTML/JavaScript code you can add to your website
- Customization options - Control over appearance, behavior, and security
The embedding process involves three main steps:
- Publish your chatbot or workflow in MindPal
- Copy the embedding code from the publish modal
- Paste the code into your website where you want it to appear
Step-by-Step: Publishing Your Chatbot
Navigate to your chatbot
- Go to your workspace in MindPal
- Click on the chatbot you want to embed
Open publish settings
- Click the “Publish” button (usually in the top right)
- Or click “Share & Embed” from the chatbot menu
Configure your chatbot
- Set a unique slug (URL identifier)
- Customize appearance (colors, logo, initial message)
- Configure access and security settings
- Set up any advanced features (custom user ID, custom session context)
Publish
- Click “Publish” to make your chatbot live
- You’ll see a success message with confetti animation
Get your embedding code
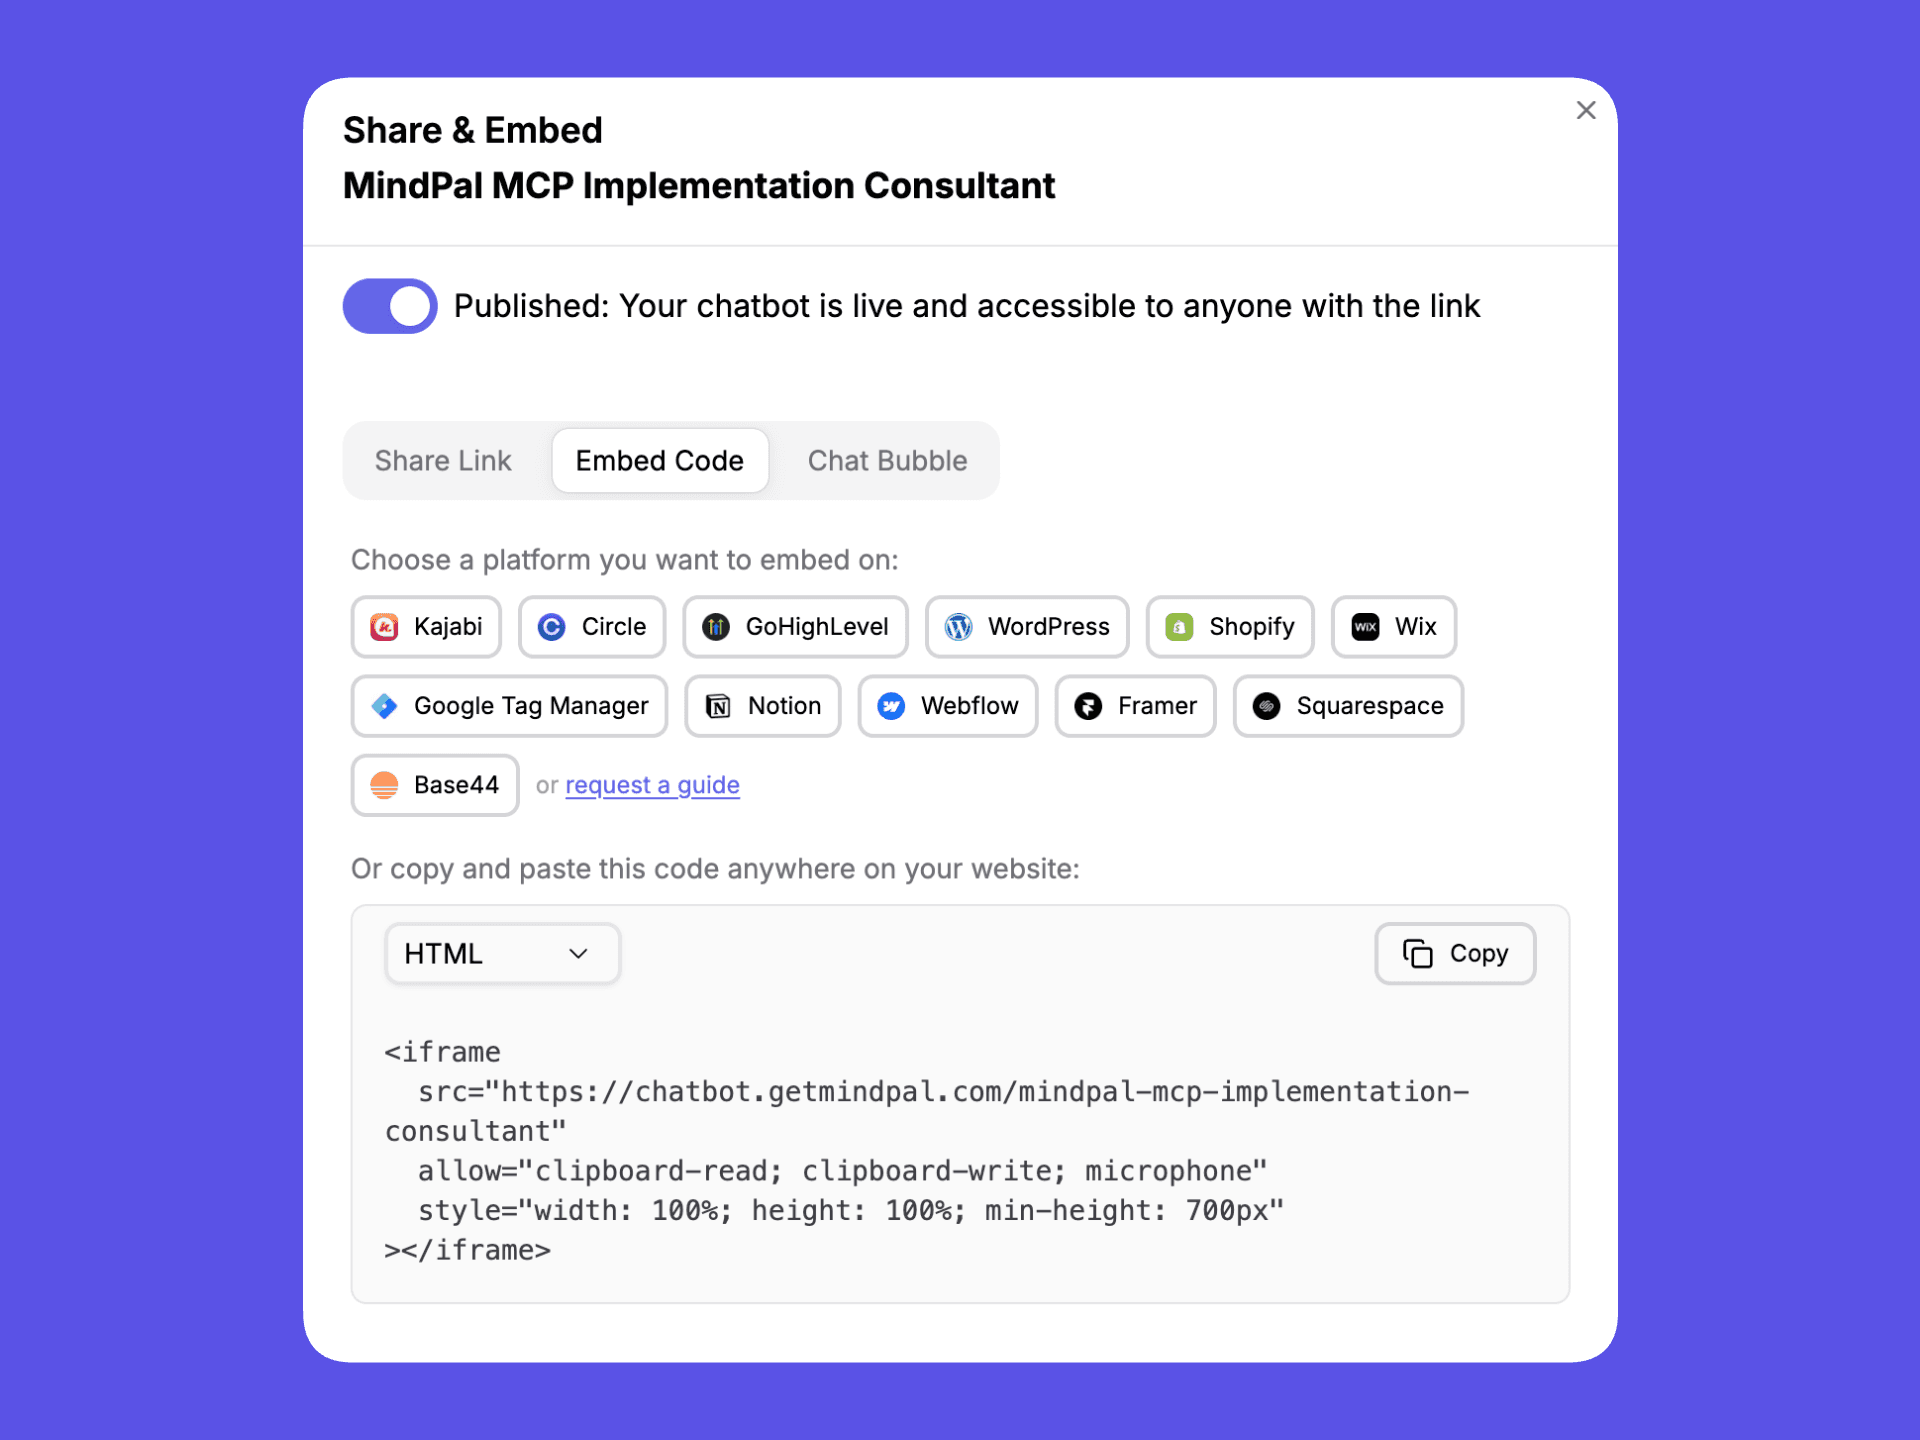
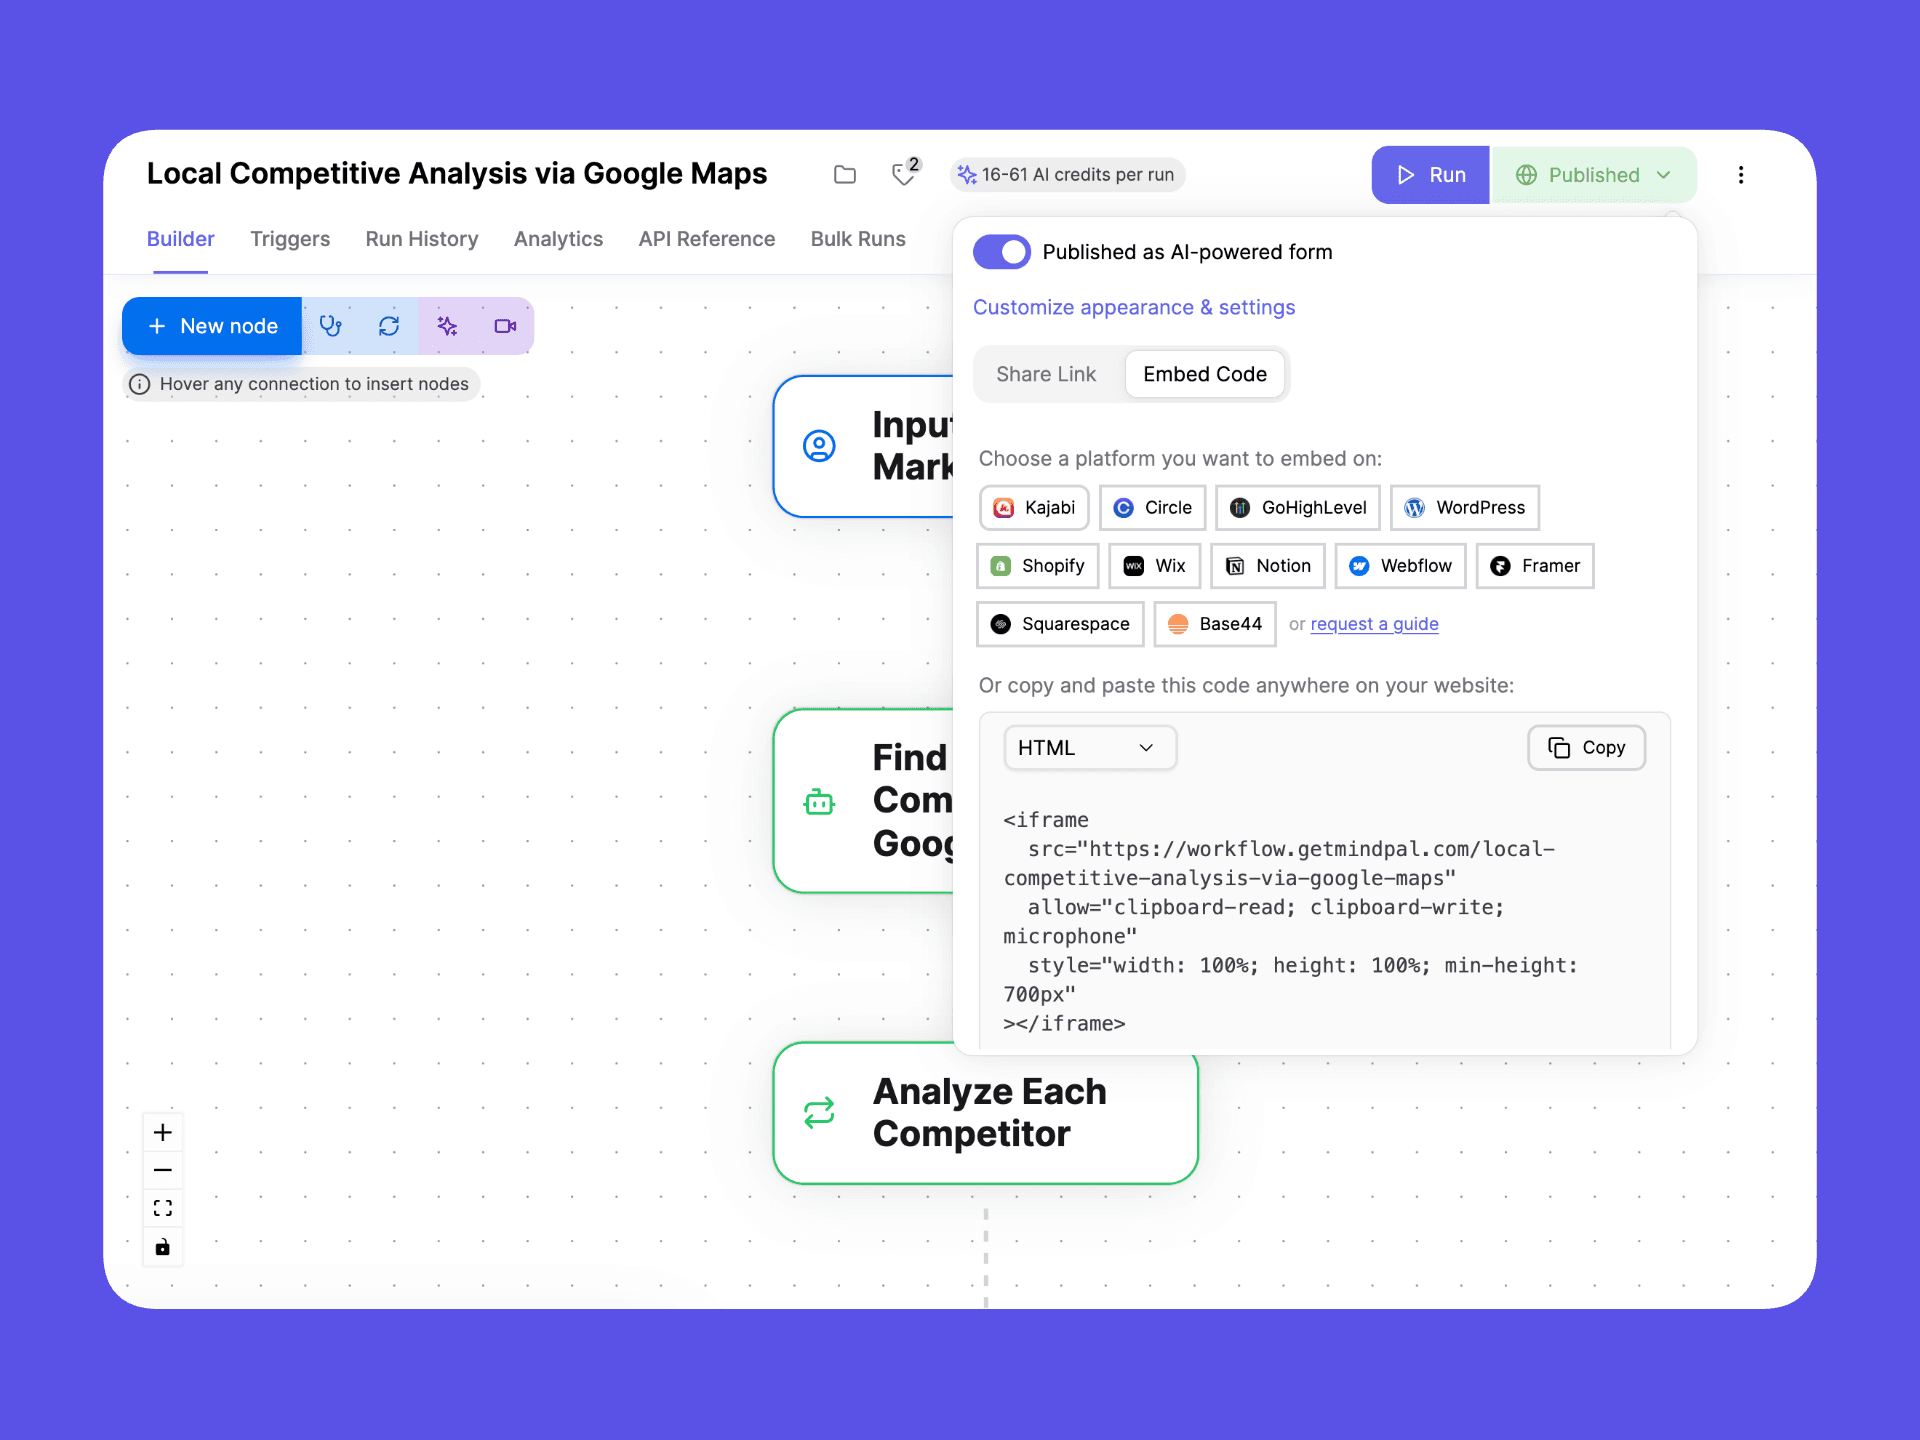
- Click “Share & Embed” to see all embedding options
- Choose your embedding method (direct link, iframe, or widget)
- Copy the code provided
Step-by-Step: Publishing Your Workflow
Navigate to your workflow
- Go to your workspace in MindPal
- Open the workflow you want to embed
Open publish settings
- Click the “Publish” button
Configure your workflow form
- Set a unique slug (URL identifier)
- Customize appearance (title, description, colors)
- Configure form settings and behavior
- Set up any advanced features (custom user ID, custom session context)
Publish
- Click “Publish” to make your workflow form live
- You’ll see a success confirmation
Get your embedding code
- Click “Share & Embed” to see all embedding options
- Choose your embedding method (direct link or iframe)
- Copy the code provided
Embedding Methods
MindPal offers three main methods for embedding your chatbots and workflows. Each has different use cases and benefits.
| Method | Best For | How It Works | When to Use | Pros | Cons |
|---|---|---|---|---|---|
| Direct Links | Email campaigns, navigation menus, buttons | Shareable URL that opens a full-page view | Email campaigns, navigation menus, social media sharing | Simple (just copy/paste URL), works everywhere, no code required, full-page experience | Users leave your website, less integrated feeling, limited customization |
| Iframe Embed | Embedding as a section on a specific page | HTML iframe element displays chatbot/workflow as a contained section | Dedicated support pages, member dashboards, product pages, landing pages | Fully integrated, maintains site navigation, can be styled, supports advanced features | Requires HTML editing access, takes up page space, may need responsive design |
| Floating Widget | Site-wide chat buttons (chatbots only) | Floating chat button in bottom-right corner opens overlay | Customer support, site-wide AI assistance, lead generation | Doesn’t take up space until opened, available on every page, familiar interface, can be minimized | Only for chatbots (not workflows), requires JavaScript, may conflict with other floating elements |
Direct Links
Chatbot Example:
https://chatbot.getmindpal.com/your-chatbot-slug
Workflow Example:
https://workflow.getmindpal.com/your-workflow-slug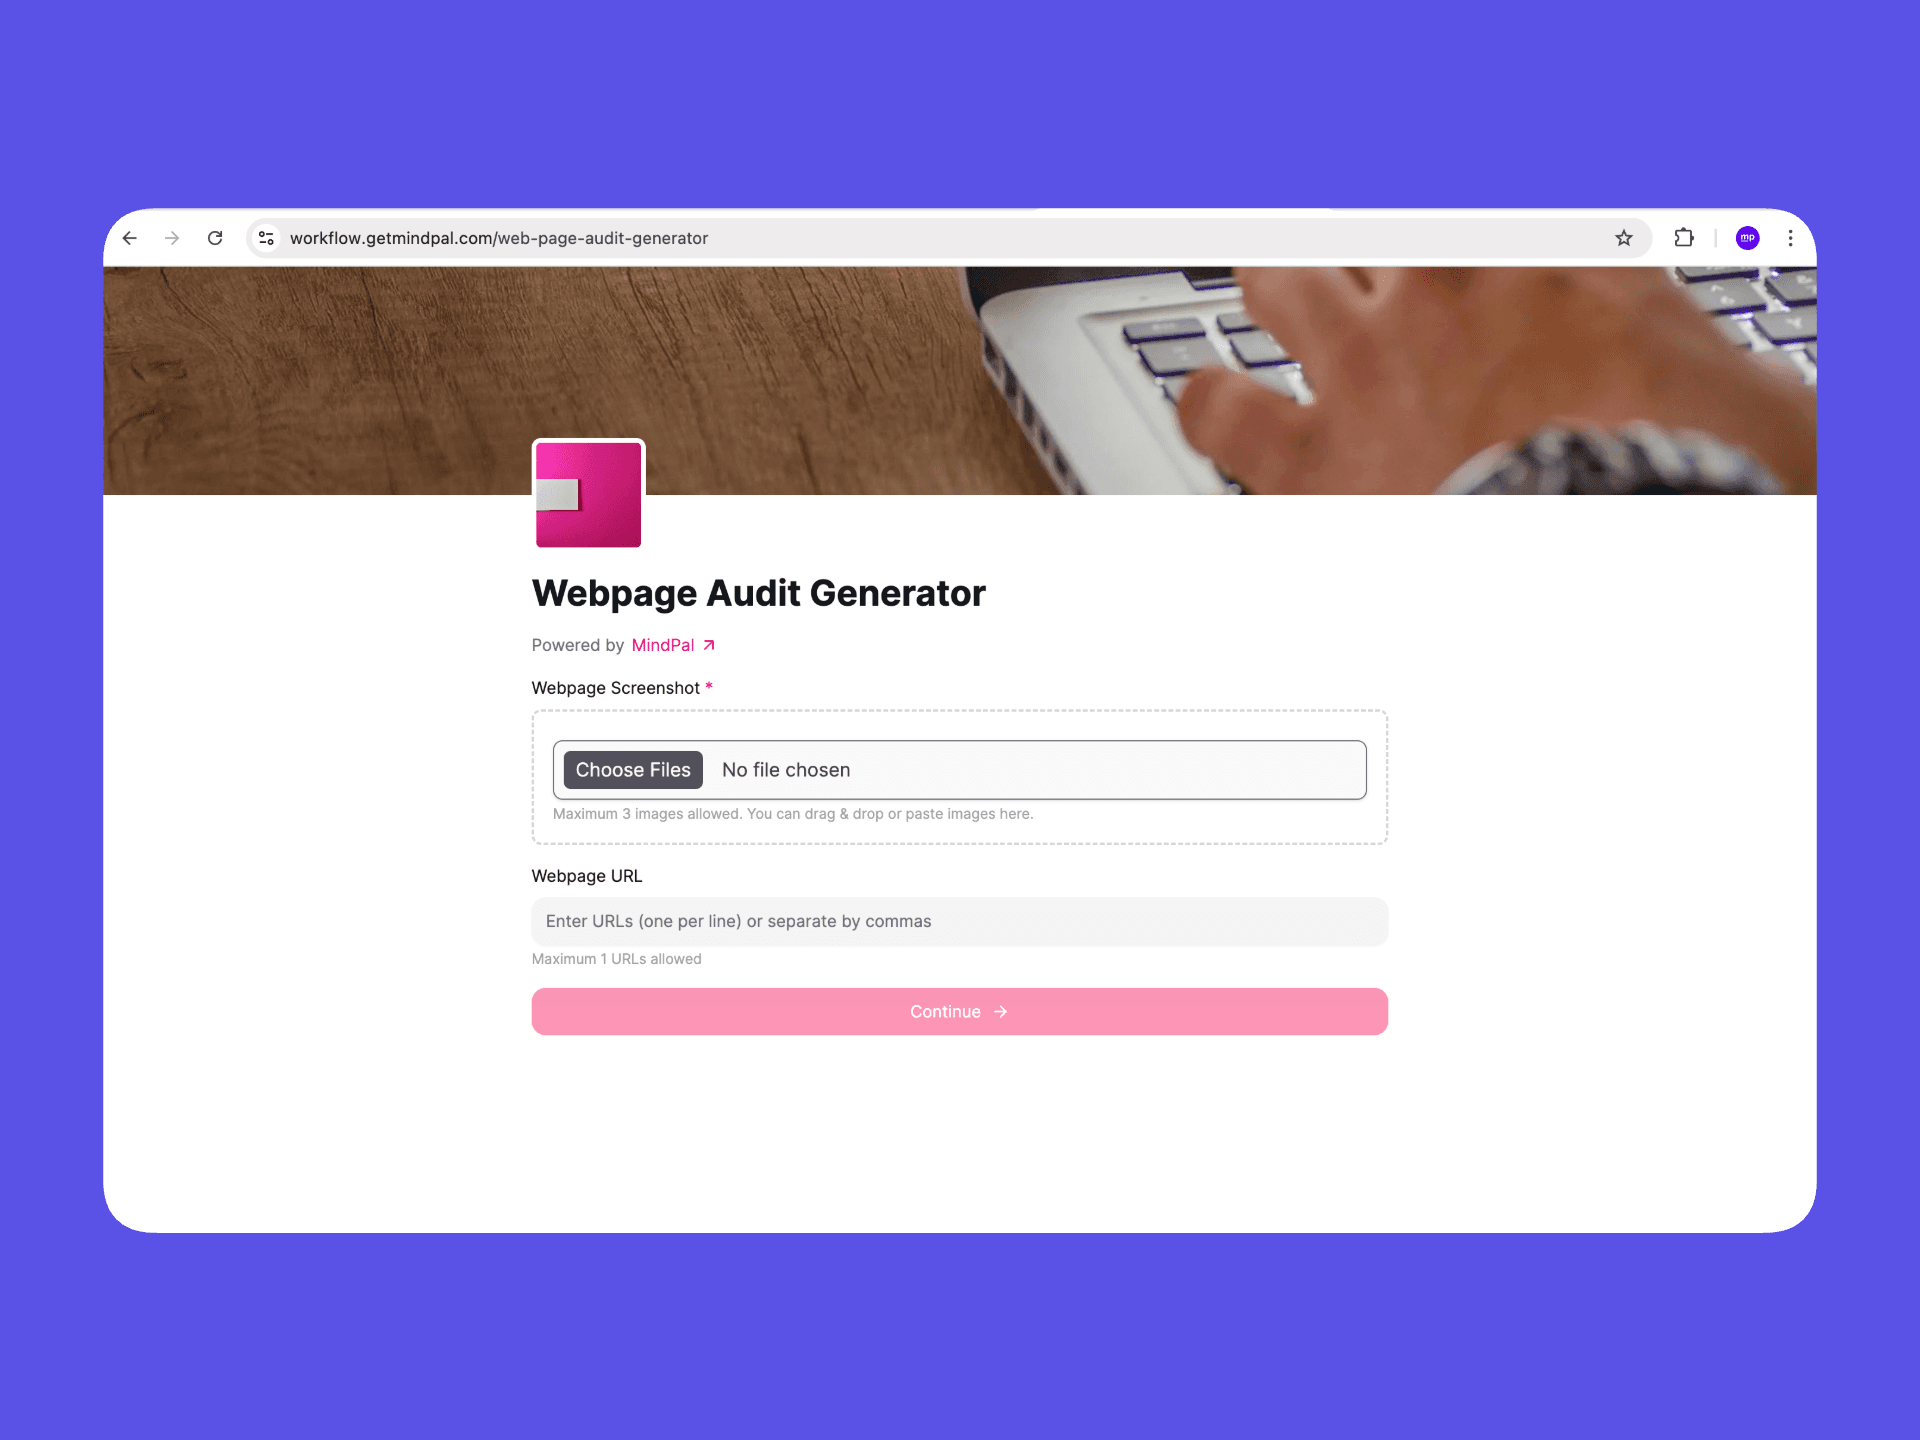
Iframe Embed
Simple Chatbot (without custom user ID or custom session context):
<iframe
  src="https://chatbot.getmindpal.com/your-chatbot-slug"
  allow="clipboard-read; clipboard-write; microphone"
  style="width: 100%; height: 100%; min-height: 700px"
></iframe>
Chatbot with Advanced Features (with custom user ID or custom session context):
<iframe
  id="my-chatbot"
  src="https://chatbot.getmindpal.com/your-chatbot-slug"
  allow="clipboard-read; clipboard-write; microphone"
  style="width: 100%; height: 100%; min-height: 700px"
></iframe>
<script>
  window.mindpalIframeConfig = {
    "my-chatbot": {
      customUserId: "USER_123", // Replace with actual user ID
      customSessionContext: {
        "customer-name": "John Doe",
        "account-type": "premium",
        "order-id": "12345",
      },
    },
  };
</script>
<script
  src="https://chatbot.getmindpal.com/iframe.min.js"
  data-target="my-chatbot"
></script>Use the simple version if your chatbot doesn’t have custom user ID or custom session context enabled. The advanced version is required when you need to pass user identification or contextual information to your chatbot.
Simple Workflow (without custom user ID or custom session context):
<iframe
  src="https://workflow.getmindpal.com/your-workflow-slug"
  allow="clipboard-read; clipboard-write; microphone"
  style="width: 100%; height: 100%; min-height: 700px"
></iframe>
Workflows with Advanced Features (custom user ID or custom session context):
<iframe
  id="my-workflow"
  src="https://workflow.getmindpal.com/your-workflow-slug"
  allow="clipboard-read; clipboard-write; microphone"
  style="width: 100%; height: 100%; min-height: 700px"
></iframe>
<script>
  window.mindpalIframeConfig = {
    "my-workflow": {
      customUserId: "USER_123", // Replace with actual user ID
      customSessionContext: {
        "customer-name": "John Doe",
        "account-type": "premium",
      },
    },
  };
</script>
<script
  src="https://workflow.getmindpal.com/iframe.min.js"
  data-target="my-workflow"
></script>
Floating Widget (Chatbots Only)
Simple Chatbot (without custom user ID or custom session context):
<script>
  window.mindpalConfig = {
    chatbotId: "your-chatbot-slug",
  };
</script>
<script src="https://chatbot.getmindpal.com/embed.min.js"></script>
Chatbot with Advanced Features (with custom user ID or custom session context):
<script>
  window.mindpalConfig = {
    chatbotId: "your-chatbot-slug",
    customUserId: "USER_123", // Replace with actual user ID
    customSessionContext: {
      "customer-name": "John Doe",
      "account-type": "premium",
      "order-id": "12345",
    },
    behavior: {
      showInitialMessageBubbleWhenMinimized: true,
      minimizedByDefault: false,
    },
  };
</script>
<script src="https://chatbot.getmindpal.com/embed.min.js"></script>Floating widgets are only available for chatbots, not workflows. For
workflows, use direct links or iframe embeds. The behavior options control
how the widget appears when minimized.
Advanced Features
MindPal embedding supports powerful advanced features that let you create personalized, context-aware experiences. These features are covered in detail in specialized guides, but here’s an overview:
Custom User ID
What it does: Identifies individual users so your chatbot or workflow can remember their conversations and provide personalized experiences.
Key benefits: Conversation history per user, personalized interactions, user-specific tracking, better integration with your user system.
Quick setup: Enable “Custom User ID” in your chatbot/workflow settings, choose a mode (Optional or Required), and pass the user ID from your website when embedding.
Example:
<script>
  window.mindpalConfig = {
    chatbotId: "your-chatbot",
    customUserId: "USER_123", // Pass your user's ID here
  };
</script>
Learn more: See the Custom User ID guide for detailed instructions, platform-specific examples, and troubleshooting.
Custom Session Context
What it does: Passes contextual information about your users (name, account type, order details, etc.) to your chatbot or workflow so the AI already knows relevant details without asking.
Key benefits: Personalized greetings and responses, context-aware conversations, no need for users to repeat information, seamless integration with your existing data.
Quick setup: Enable “Custom Session Context” in your chatbot/workflow settings, define context keys (e.g., “Customer Name”, “Account Type”), and pass context values from your website when embedding.
Example:
<script>
  window.mindpalConfig = {
    chatbotId: "your-chatbot",
    customSessionContext: {
      "customer-name": "John Doe",
      "account-type": "premium",
      "order-id": "12345",
    },
  };
</script>
Learn more: See the Custom Session Context guide for detailed instructions, platform-specific examples, and security best practices.
Platform-Specific Instructions
MindPal provides optimized embedding instructions for popular platforms. When you use the “Share & Embed” feature, you can select your platform to get customized code.
Supported Platforms
- Kajabi - Dedicated integration guide available
- Circle - Dedicated integration guide available
- GoHighLevel - Dedicated integration guide available
- WordPress - Widget or iframe methods with PHP integration
- Shopify - Liquid template integration for customer data
- Wix - Velo code or static embed options
- Google Tag Manager - Tag management system integration
- Notion - Iframe embed support
- Webflow - Custom code integration
- Framer - Interactive design platform integration
- Squarespace - CMS integration
- Base44 - Coding platform with built-in authentication
- Custom Websites - Generic HTML/JavaScript code
When you select a platform, you’ll get platform-optimized code, specific instructions for that platform, automatic mapping of user data fields (where supported), and platform-specific best practices.
Security & Access Control
Domain Restrictions
What it does: Prevents unauthorized websites from embedding your chatbot or workflow.
How to enable: Go to your chatbot/workflow settings, navigate to “Access & Security” or “Control access”, enable “Embedding Restrictions”, and add your allowed domains (one per line).
Example:
yourwebsite.com
app.yourwebsite.com
*.yourwebsite.com
Why it matters: Without domain restrictions, anyone could embed your chatbot on their website, potentially using your AI credits or creating a poor user experience.
Rate Limiting
What it does: Controls how many requests users can make to prevent abuse and manage costs.
How to enable: Go to your chatbot/workflow settings, navigate to “Access & Security”, and configure rate limit rules with different scopes (Global, Per IP, Per user, Per session). Set maximum requests and time window for each rule.
Example: Maximum requests: 50, Time window: 1 hour, Scope: Per IP address. This means each IP address can make 50 requests per hour. You can configure multiple rules with different scopes and time windows for flexible rate limiting.
Learn more: See the Rate Limit guide for detailed configuration options.
Next Steps
Now that you understand embedding basics, explore these related guides:
- Custom User ID - Enable personalized experiences with user identification
- Custom Session Context - Pass contextual information to your chatbots and workflows
- Rate Limiting - Control usage and prevent abuse